CONTACT US
07534918741
hello@justplaygames.uk

Hi Everybody,
Ian here from Team JustPlay, with a blog post about something a bit different... Flames of War!
As many of you will know, I'm currently on hiatus from competitive (and in fact, all) Age of Sigmar and I've been really enjoying running and playing in our Flames of War Hobby League. I've also been enjoying painting up my autumn-themed Soviets, which have gotten a great reaction online - a very unusual feeling for me!

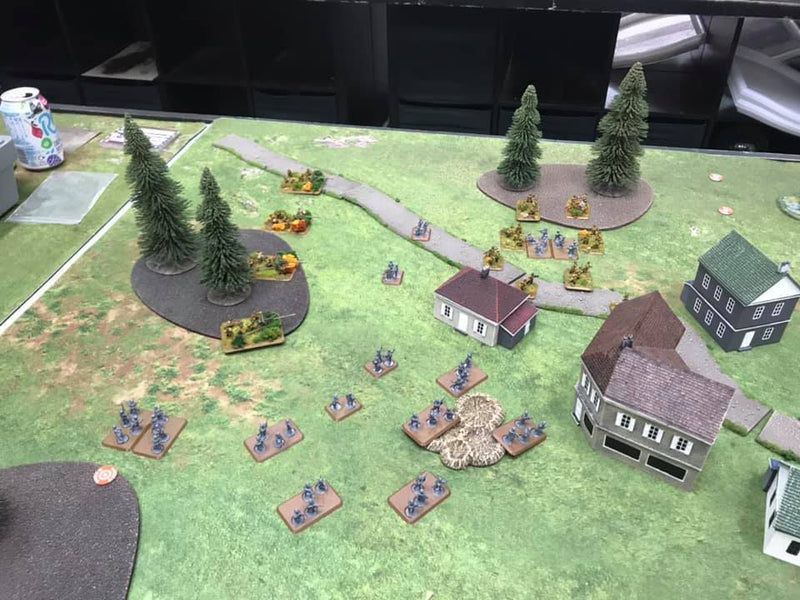
Anyway, on with the blog post. I was inspired to write this post looking at a picture of a game I played yesterday at JustPlay in Liverpool, against one of our long time regulars, Laurent. Flames of War is a game with really good tactical options and an awful lot to think about in terms of unit placement - moreso than other games I play. Looking at this picture, I was appreciating how great the game was that there were so many different things going into the way I deployed, and I thought it was something worth sharing - whether to show you what a cool game Flames is and how much potential it has for good play, or to give you some things to think about next time you deploy your own army. The picture in question is this one:

We were playing a 75 point game, me as the Defender with my Russian mostly-infantry company, Laurent as the attacker with his Sherman company. I was running the following list:
And across from me, was this beast of a list:

That's a whole pile of Shermans, Stuarts, M10s, Priests, and even more Shermans hiding in the far woods!
Let's look at my deployment again, this time with some visual aids:

I'm defending. In Flames of War, this means I have to leave 40% of my army off the table. In my case, my list was put together so that this would be all of my tanks and armoured cars; they're mobile, and if I only get one unit on it can be a big block of Churchills. My infantry are survivable, they can dig in, and lots of people use lots of tanks which infantry are pretty good at weathering the fire from. In return I have two units of anti-tank guns and some planes to shoot enemy stuff with whilst it tries to clear my infantry.
The green circles above are the objectives, some captured American soldiers (totally not because we both forgot to bring objective markers). Laurent wins immediately if he captures these, so I need to defend them. In two of the red circles above, you can see I have my rifle infantry; in the middle, my HQ unit, and behind them, my big anti tank guns. I keep my smaller anti tank guns, the 76mms, off the table in ambush; I want to try to get them side or close range shots from ambush to compensate for their weaker anti-tank values. The 57mms on the board also have longer range for sitting back and firing.
Now, so far, this all seems pretty standard. But let's examine the placement of the units in the picture more closely (note: the angled bottom gun in the pic below had been knocked; he should be facing forward!):

These anti-tank guns are the rock upon which I want my opponent's assault to break, but the infantry still need to keep the enemy tanks at arm's length. All of my guns are positioned so that, if my opponent wants to get within 16" of my infantry and machine gun them with his tanks, my 28" range guns will be able to shoot the tanks back. I don't want my opponent to be able to wear down my defenceless infantry and I don't want to have to get my guns out of their foxholes, especially since I know for sure that his artillery will be shooting at my guns as target #1. Which brings me to the next point: notice that the guns are all placed 1.5" apart (purple lines), meaning he can only hit two with an artillery template, to limit the damage these important guns are going to take!
This said, I still have potential problems here. My guns can be pinned, reducing their RoF low enough that my force can be overwhelmed. Focus fire and artillery could blow up my infantry, a tank assault could drive them back off an objective so I just lose. My opponent can sneak around the trees at the top and get close to my guns. So let's solve those problems!

In the above picture, you can see that my HQ unit is positioned very specifically; he is within 6" of the unit leaders of all three of my other units, but far enough away from those units that artillery shooting at him would cover very few stands. This placement is to make sure that my guns, which will inevitably get pinned every turn (and did) get rerolls on their unpin roll, taking their unpin chance from 66% to 88%; and also that my infantry units will pass their counterattack rolls and hold their ground or drive off any assaulting tanks (they did!). There's actually a mistake in my deployment here - I gained nothing by the second HQ stand being above the first one, and should have had him base to base so that if the HQ died the second stand was in range of all three units too.
The other important thing to note in the pic above is my placement of minefields. I was worried that my opponent might drive tanks around the top trees, or even sit them in the gap occupied by the mines and shoot at my infantry at close range whilst being out of line of sight of the guns due to the woods. I placed these two minefields to work like a funnel, forcing him to take my infantry head-on (and in full view of at least 3 of my guns) if he wanted to push through this area. My last minefield was just off-pic, where the purple arrow is, on the road, to ensure no quick dashes through the covered village and into my infantry. Minefields are awesome but people often try to put them where they think the enemy will go rather than using them as area denial, which is what I think they're best at.

In the picture above, I've marked two more important things: gaps. Space. It's easy to forget in the heat of the moment during deployment, that sometimes the best position for those ambushing guns is simply behind your troops; they get protection after they're placed, and importantly, get free shots at anyone trying to assault your infantry as long as they are within 8". Mis-positioning my on-table guns, or my HQ unit here could have meant that I didn't have room to deploy my 76mms (and they're on large bases), denying me a valuable option for my ambushing units.
Lastly, lets talk about my objective cover. I've obviously dedicated more defence - gun arcs, forward infantry on top of the objective, and minefields, to the top objective. It's closer to my opponent, and easy for me to be overwhelmed on, so I wanted to make it an unappealing target. Why did I leave the objective a little ways off from my second infantry unit, and not deploy them more on the green lines shown below? Well, I didn't want my opponent cutting through my middle, ignoring the back objective and surrounding the forward one, as the red arrows show :

I was also aware that a push through the woods at the pink arrows - despite the minefields - could get him with units on the objective that I couldn't see to shoot back at, so I wanted my bottom infantry unit close enough to reinforce that objective strongly and immediately if needed. And finally, I had a lot of tanks in reserve which could easily hold the bottom objective by coming on at yellow if needs be.
Despite what the old adage says, this plan absolutely survived contact with the enemy! My opponent pushed up the bottom of the table, but was held off by the infantry long enough for my 57mms and ambushing 76mms (which came on in the woods at the bottom left of the picture, got assaulted, and all bogged down and died!) to take their toll on the Shermans. When my reinforcements came on (on turn 4 with immediate reserves! thanks dice...) they ended the game.
I hope this article, inspired by a single picture as it was, has been of some interest! If you're interested in Flames of War I can highly recommend the game; it's a lot of fun and gives you a lot to think about as a player. If you already play Flames of War, I hope that you either have some new stuff to think about next time you play or were at least nodding along with some of my decisions!
Until next time,
Ian Over and Out
Like the article? Consider supporting us by making your next Flames of War or other hobby purchase from JustPlay's Online Store!
Comments, thoughts, questions, or praise? Follow us on Twitter @justplaygamesuk and find Ian @justplay_ian!